If you’re an air hockey player, you know the frustration of hitting dead spots on an air hockey table.
The puck doesn’t have the same zing, and your game suffers.
But never fear! There are some easy ways to fix those pesky dead spots.
With a little effort, you’ll be back to playing your best in no time.
That’s how you fix the dead spots
Here is what you need to do – step by step:
First of all, find the dead spots
To help you identify the dead spots on your air hockey table, check the playing surface for one area that provides an unequal amount of friction.
You can also use two or three different pucks to see if there are any variations in their grip on the table.
This will help you pinpoint the exact location of the dead spot on your air hockey table.
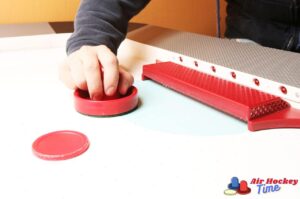
To create more friction at a dead spot on your air hockey table, take a metal coin
And use it with care to add increased grip in that specific area.
Start the table, put the puck in the affected area, and check if it slides.
If needed, continue adding friction using the coin until you get the desired result.
Don’t forget to clean the surface
After creating more friction with a coin or other object, be sure to clean up any excess adhesive from the playing surface.
Use a damp cloth and paper towels to carefully wipe away the adhesive so that it does not affect the way your puck slides across the smooth surface in future games.
To ensure that your air hockey table is ready to play, make sure to clean up any excess water with paper towels and dry the surface completely.
This will prevent damage or warping when it has dried fully, allowing you to enjoy your next game of air hockey.
How do you clean the holes on an air hockey table?
To effectively clean the air holes on your air hockey table, switch it ON and use a stickpin to remove any dirt particles.
Alternatively, you can employ a 1/32” drill bit or Dremel bit to scrape out the dirt from the air hole as the bit spins.
How do you clean an air hockey table without damaging it?
To clean an air hockey table without causing any damage, use a soft cloth or microfiber rag with lukewarm water and mild detergent.
Gently wipe the surface of the table and avoid using abrasive cleaners or brushes.
To get into the tiny holes, you can use a vacuum cleaner extension attachment on low suction to suck up all the dust internally.
When cleaning is complete, be sure to dry off any excess moisture to prevent any rust or discoloration from forming on the table.
How to refurbish an air hockey table?
If your air hockey table has taken a beating and needs some refurbishing, don’t fret.
You can restore it to its former glory without having to buy a new surface.
For minor dents, fill them in with clear epoxy, then sand down the area with sandpaper after it sets. Re-drill any clogged air holes and you’re good to go!
Why is my air hockey table not blowing air?
If your air hockey table isn’t blowing any air, then there’s a good chance the holes are clogged.
This could be from dirt and debris that has built up over time or from objects that have been accidentally dropped into the holes.
To unclog the holes, try using a vacuum cleaner attachment on low suction to remove any dirt and debris that might be stuck inside.
If vacuuming does not work, then try poking the holes with a needle.
Exercise caution while carrying out this task to avoid expanding the size of the holes.
In conclusion
With just a few simple steps and some elbow grease, you can fix dead sports on an air hockey table with no problem and make sure your table is ready to provide hours of fun.
So get out there and start playing!
I hope you found this article useful. Don’t forget to visit my other blog posts and let me know what you think in the comments section below.
Happy gaming with no dead spots!